Hey everyone,
Please note, this a guide to building a concept data warehouse and will not be suitable to build an enterprise data warehouse
Please view the source files here – https://github.com/kplofts/datasolve_dw_sql
Do you want the bad news first or the good news? Lets start with the bad news.
You are likely to fail
Analyzing the four studies by Gartner, McKinsey & Company, TDWI, and MIT Sloan Management Review, several reasons for data warehouse project failures are commonly mentioned across all studies:
- Lack of Clear Objectives and Strategy
- Poor Data Quality
- Complex Data Integration
- Inadequate Skills and Resources
Gartner highlights the challenges of data integration and undefined business goals, McKinsey emphasizes the need for a clear strategy and skilled talent, TDWI points to poor requirements gathering and data quality control, and MIT Sloan stresses the importance of alignment with business needs and early successes. Addressing these issues can significantly enhance the success rate of data warehouse initiatives.
With that in mind, here is the good news: if you follow this guide and watch my video on YouTube, I will demonstrate the critical link between effective communication and technical execution. This will greatly enhance your chances of successfully implementing a data warehouse and gaining buy-in from business managers.
Please note that this guide specifically addresses using SQL Server. In a real business setting, complexities may necessitate different approaches beyond just using SQL.
I’ve taken concepts from Ralph Kimball’s Dimensional Methodology and Vincent Rainardi’s “Building a Data Warehouse with Examples in SQL Server,” along with my personal experience working with clients. Although this guide won’t be as in-depth as those sources, it should still provide practical insights into implementing a data warehouse.
Building a comprehensive data warehouse can take months and even years to perfect, but we’ll complete the entire process in just a few hours.
We’ll split this process into two main parts:
- Business Logic
- Technical Implementation
Both are equally important, and we’ll treat them with the same level of significance.
Let’s dive into the sub-tasks for each topic.
| Type | Sub-tasks |
| Business Logic | Requirement Gathering and Planning |
| Data Modeling | |
| Technical Implementation | Creating the data warehouse |
| Creating the ETL | |
| Final Unit Testing to Ensure Accuracy |
Requirement Gathering and Planning
Effective Client Communication
Effective communication constitutes 70-80% of the work when dealing with clients. Before starting a project, it’s crucial to get answers to the following questions.
What are the primary business objectives for implementing a data warehouse?
Does the company have business process documents?
To be an effective data warehouse developer, you must combine the skills of a database administrator (DBA) ,business analyst and data engineer.
Many people overlook communication, jumping straight into development. However, this can cause problems if the customer’s needs are not clearly defined.
It’s okay if not all questions can be answered initially, as long as the client is willing to find the answers and assist you. A lack of willingness can complicate your role and lead to problematic relationships.
If the client cannot provide direct answers or the necessary structure, give them time to gather the required information. However, some questions are mandatory to begin developing a data warehouse.
Sign up to our newsletter to receive a free PDF
Comprehensive Client Engagement and Planning for Data Warehouse Development
Once you have gathered the required business information – then you may proceed with a dimensional modelling process.
Dimensional Model Process
- Identify Business Processes:
- Determine the key business processes to be analyzed and measured.
- Define the Grain:
- Decide the level of detail for each fact table (e.g., individual transactions, daily summaries).
- Identify Dimensions:
- Dimensions are descriptive attributes related to facts. Common dimensions include time, geography, product, and customer.
- Dimensions provide context for facts and are typically stored in dimension tables.
- Identify Facts:
- Facts are the numeric measures of a business process, such as sales revenue, quantity sold, or transaction counts.
- Facts are stored in fact tables and are often linked to dimension tables via foreign keys.
- Design Fact Tables:
- Fact tables store the quantitative data for analysis and are often designed to be additive across dimensions.
- Ensure each fact table has a primary key composed of foreign keys from the dimension tables.
- Design Dimension Tables:
- Dimension tables store the descriptive attributes and are typically denormalized to optimize query performance.
- Each dimension table has a primary key that uniquely identifies each dimension record.
- Establish Relationships:
- Create relationships between fact tables and dimension tables, usually through foreign keys.
- Build and Populate Tables:
- Implement the fact and dimension tables in SQL and load data accordingly.
By following this process, you create a scalable and efficient data warehouse that enables robust analysis and reporting.
With that said, I have created a hypothetical client to demonstrate how we can create a data warehouse in SQL. For this use case, I have simplified the client’s business model, focusing on a few elements. In a real-life scenario, there would be much more complexity.
Company Overview:
Hutchinson and Co. is a mid-sized enterprise that operates in the retail and e-commerce sector. The company specializes in selling a wide range of consumer goods, including electronics, home appliances, clothing, and personal care products. Hutchinson and Co. has both physical retail stores and an online presence, catering to a diverse customer base across multiple regions.
Business Model:
- Omni-Channel Retailing:
- Physical Stores: Hutchinson and Co. operates a chain of retail stores located in urban and suburban areas, offering customers a traditional shopping experience.
- E-Commerce Platform: The company’s e-commerce platform allows customers to browse and purchase products online, with options for home delivery or in-store pickup.
- Product Diversification:
- Electronics: A range of electronic devices, including smartphones, laptops, and home entertainment systems.
- Home Appliances: Kitchen appliances, cleaning equipment, and other household items.
- Clothing: Fashion apparel for men, women, and children, including seasonal collections.
- Personal Care: Beauty products, health supplements, and personal hygiene items.
- Marketing and Promotions:
- Seasonal Sales: Regular promotions during major holidays and sales events (e.g., Black Friday, Cyber Monday).
- Targeted Marketing: Personalized marketing campaigns based on customer purchase history and preferences.
- Supply Chain and Logistics:
- Inventory Management: Efficient management of stock levels across all retail locations and the e-commerce warehouse.
- Logistics Network: A robust logistics network to ensure timely delivery of online orders and restocking of physical stores.
Current Data Challenges:
- Integrating Sales Data: Combining sales data from physical stores and the e-commerce platform to get a unified view of overall performance.
- Customer Insights: Analyzing customer behavior and purchase patterns to improve targeted marketing and personalized offers.
- Inventory Management: Ensuring optimal stock levels to avoid overstocking or stockouts, which requires real-time inventory tracking.
Data Warehouse Solution:
To address these challenges, Hutchinson and Co. is considering implementing a data warehouse solution to consolidate data from various sources, enhance reporting capabilities, and support advanced analytics for better decision-making and operational efficiency.
So lets dive into creating a dimensional model for Hutchinson and co. Which will serve as the foundation of this data warehouse.
Firstly we would need to understand the business processes before creating the dimensional model – We are not going to cover each and every business process but for the sake of this exercise we will cover the following
- Selling Products
- Inventory Management
- Marketing and Promotion
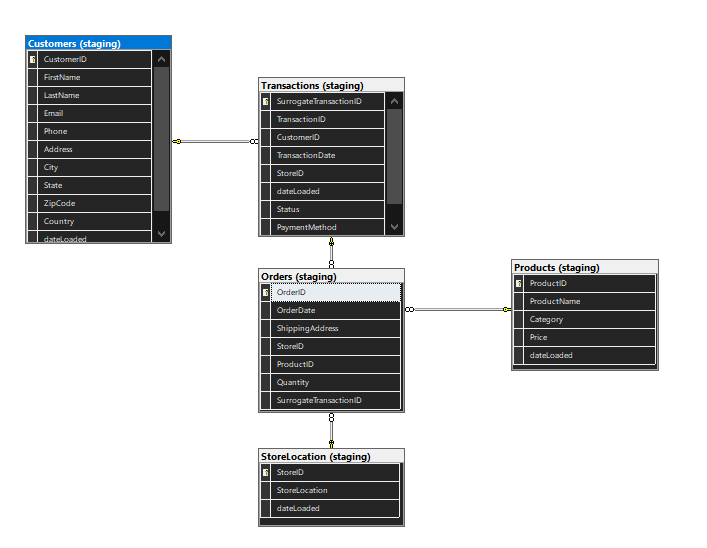
Converting Business Logic into ERDs
Here is a high-level view of the cardinality within this ERD
| Relationship type | Description | Example |
| One-to-Many (1-M) | One record in a table relates to multiple records in another table. | A single customer can place multiple orders. |
| Many-to-Many (M-N) | Multiple records in one table relate to multiple records in another table. | Students can enroll in multiple courses, and each course can have multiple students. |
Before we begin the dimensional model we will convert the business process into Entity relationship diagrams to get a better understanding of the business process
We will focus on one business process which is the customer purchasing a product

Customer to transaction
A single customer can make multiple transactions over time. Each transaction is associated with only one customer. This is a common scenario in retail and e-commerce environments where customers return to make additional purchases.
| Customer_ID | Transaction_ID |
| CUS_001 | TRN_001 |
| CUS_001 | TRN_002 |
| CUS_001 | TRN_003 |
Using a surrogate key like ‘Transaction_ID’ in a fact table improves readability and avoids the ambiguity of composite keys. Explicitly declaring a surrogate key ensures each record is uniquely and consistently identifiable, enhancing schema clarity and simplifying database operations.
CREATE TABLE SalesFactSurrogate (
    Transaction_ID INT IDENTITY(1,1) PRIMARY KEY,
    DateKey INT,
    ProductKey INT,
    CustomerKey INT,
    StoreKey INT,
    SalesAmount DECIMAL(10, 2),
    Quantity INT
);
CREATE TABLE SalesFactComposite (
    DateKey INT,
    ProductKey INT,
    CustomerKey INT,
    StoreKey INT,
    SalesAmount DECIMAL(10, 2),
    Quantity INT,
    PRIMARY KEY (DateKey, ProductKey, CustomerKey, StoreKey)
);
When designing your data warehouse, it’s crucial to build a solid table structure. Using a composite key, such as DateID, ProductKey, CustomerKey, and StoreKey as seen above, poses a slight risk.
For example, if a customer buys the same product in the same store on the same day, it would violate the primary key. To ensure uniqueness, you would need to create a time dimension, adding complexity.
To avoid this complexity, simply use a surrogate key. This approach eliminates the problem and simplifies the design.
A composite key could potentially be less expensive in terms of storage because it does not require an additional column. However, it may lead to higher complexity and maintenance costs, especially if the key consists of multiple columns and the table grows large.
Surrogate keys, while adding an extra column, simplify joins and indexing, often leading to better performance in querying and maintenance. The slight increase in storage is usually offset by these performance gains.
Transaction to Order: A single transaction can include multiple orders, especially in scenarios where a customer buys multiple products in one purchase session. Each order within the transaction will reference the same transaction ID.
| Transaction_ID | Order_ID |
| TRN_001 | ORD_001 |
| TRN_001 | ORD_002 |
| TRN_001 | ORD_003 |

A caveat to normalizing your database is that querying can introduce overhead due to complex joins. To mitigate this, you can use indexed views. Unlike materialized views in systems like PostgreSQL, indexed views in SQL Server provide real-time updates without manual or scheduled refreshes, maintaining consistency and improving query performance. However, this solution may not fit every use case, so further research is recommended before implementation.
CREATE VIEW OrderProductDetails
WITH SCHEMABINDING AS
SELECT
    o.OrderID,
    o.OrderStatus,
    o.DeliveryMethod,
    o.TransactionID,
    od.ProductID,
    p.ProductName,
    p.UnitPrice,
    od.Quantity
FROM
    dbo.Orders o
JOIN
    dbo.OrderDetails od ON o.OrderID = od.OrderID
JOIN
    dbo.Products p ON od.ProductID = p.ProductID;
GO

CREATE UNIQUE CLUSTERED INDEX IDX_OrderProductDetails
ON OrderProductDetails (OrderID, ProductID);
Now we have a solid understanding of the business process and the erd has been formatted to comply with 3nf we will progress with the dimensional model
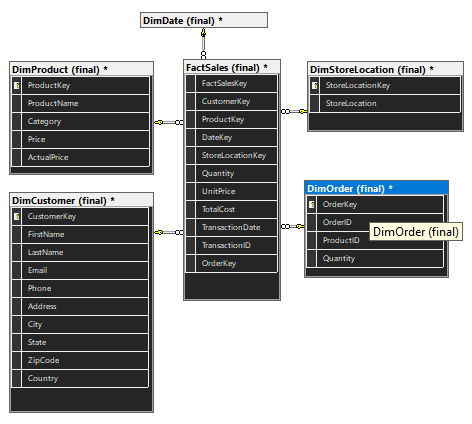
Dimensional Model
Creating a dimensional model from an ERD may seem like extra work initially, but it pays off in the long run. Starting with an ERD helps us fully understand complex business scenarios, ensuring a solid foundation for the dimensional model as we move forward.
An intriguing study examined the memory recall of users interacting with ERDs and dimensional models. The findings supported Kimball’s approach, demonstrating that dimensional models offer superior recall. For further details, you can read the study here.
The dimensional model aims to create a schema based on fact and dimension tables, aligned in either a star, snowflake, or the newer galaxy visualization. Stepping back, we create a dimensional model to enhance query performance and simplify data analysis.

Dimension Table: A dimension table contains descriptive, textual or categorical data (dimensions) that provide context for the facts. Examples include customer details, product information, time periods, and geographic locations. These tables help in filtering, grouping, and labeling data in queries.
Fact Table: A fact table contains quantitative data for analysis and is often denormalized. It holds measurable, numerical data (facts) such as sales amounts, transaction counts, or performance metrics, and is linked to dimension tables through foreign keys.
We also need to include a date dimension so we can visualize our facts across the axes of time. This is akin to a data cube, where each axis represents a different dimension of the data.
Axis of a Data Cube
- Dimensions: Each axis of the cube represents a dimension, such as time, product, or customer. In this case, adding a date dimension allows us to analyze transactions over different time periods (e.g., daily, monthly, yearly).
- Facts: The cells within the cube represent the fact data, such as sales amounts or transaction counts. By navigating the cube along different axes, we can aggregate and view data from various perspectives.

Example of Data Cube Axes
- Time Axis: Represents different time periods (days, months, years).
- Product Axis: Represents different products or product categories.
- Store Location: Represents different customers or customer segments.
Time Axis: Represents different time periods (days, months, years).
Product Axis: Represents different products or product categories.
Store Location Axis: Represents different store locations.
By incorporating the date dimension into our schema, we enable multi-dimensional analysis, allowing us to slice and dice the data along these axes to uncover trends and insights across time, product lines, and store locations. This multi-dimensional approach greatly enhances our ability to perform comprehensive data analysis.
Sure, here is the tabular output for the table definitions based on the provided

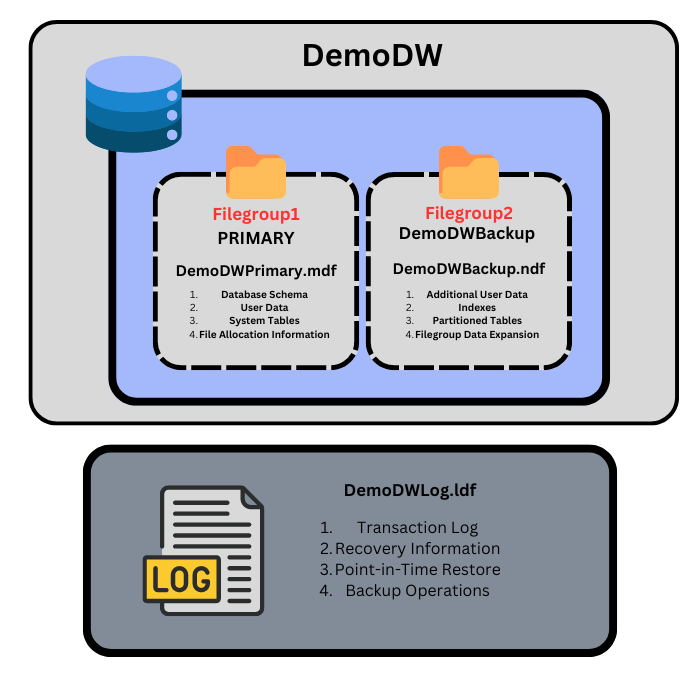
Now that we have our dimensional model, we need to create the database to store these tables. Below is a streamlined explanation and the necessary SQL script to set up a simple yet effective database architecture.

Database Architecture
Recovery: The transaction log plays a crucial role in database recovery. Keeping it separate ensures that even if data files are damaged or lost, the transaction log can be used to recover the database to a consistent state.
PRIMARY Filegroup:
Purpose: The PRIMARY filegroup contains the primary data file and often the system tables. It’s the default filegroup where objects are stored if no filegroup is specified.
Why it matters: Keeping the core data in a dedicated primary filegroup ensures that the main database operations have a structured and optimized area for storage.
Secondary Filegroup (DemoDWBackup):
Purpose: A secondary filegroup is used to store additional data files. This can include large tables, indexes, or partitioned data.
Why separate filegroups:
Performance: Spreading data across multiple filegroups can improve I/O performance by reducing contention. Different filegroups can be placed on different physical disks, allowing parallel read/write operations.
Maintenance: It simplifies maintenance tasks. For example, you can back up and restore specific filegroups rather than the entire database, which can save time and resources.
Scalability: Helps in scaling the database as data grows. Different filegroups can be managed independently, allowing for more flexibility in data management.
Log File:
Purpose: The log file stores transaction logs, which record all transactions and database modifications. This ensures data integrity and supports recovery operations.
Why not in a filegroup:
Transaction Log Architecture: Log files are managed separately from data files and are not part of any filegroup. This separation allows SQL Server to handle transaction logs independently, optimizing performance and ensuring data integrity.
-- Creates a new database named 'DemoDW' with primary and secondary filegroups.
-- Using filegroups allows better management of database files and can improve performance and backup strategies.
CREATE DATABASE DemoDW
ON PRIMARY (
    NAME = DemoDWPrimary, -- Name of the primary data file
    FILENAME = 'C:\SQLData\DemoDWPrimary.mdf', -- Path to the primary data file
    SIZE = 50MB, -- Initial size of the primary data file
    MAXSIZE = UNLIMITED, -- No maximum size limit for the primary data file
    FILEGROWTH = 10MB -- The file will grow in increments of 10MB
),
FILEGROUP DemoDWBackup ( -- Secondary filegroup for additional data
    NAME = DemoDWBackup, -- Name of the secondary data file
    FILENAME = 'C:\SQLData\DemoDWBackup.ndf', -- Path to the secondary data file
    SIZE = 50MB, -- Initial size of the secondary data file
    MAXSIZE = UNLIMITED, -- No maximum size limit for the secondary data file
    FILEGROWTH = 10MB -- The file will grow in increments of 10MB
)
LOG ON (
    NAME = DemoDWLog, -- Name of the log file
    FILENAME = 'C:\SQLData\DemoDWLog.ldf', -- Path to the log file
    SIZE = 20MB, -- Initial size of the log file
    MAXSIZE = 100MB, -- Maximum size limit for the log file
    FILEGROWTH = 10MB -- The file will grow in increments of 10MB
);
So now we have created the database we need to devise a backup strategy plan
- Full Backup:
- Performed daily at 2 AM.
- A second full backup is performed at 6 AM.
- Differential Backup:
- Performed every 4 hours.
- Example times: 6 AM, 10 AM, 2 PM, etc.
- Transaction Log Backup:
- Performed every 15 minutes.
Specific Example on 01/01/2024
- 2 AM: Full backup taken.
- 6 AM: Full backup taken.
- 6 AM to 10 AM: Differential backup is scheduled to run at 10 AM.
- Every 15 minutes: Transaction log backups are taken.
Timeline:
- 2:00 AM: Full backup completed.
- 6:00 AM: Full backup completed.
- 6:15 AM: Transaction log backup.
- 6:30 AM: Transaction log backup.
- 6:45 AM: Transaction log backup.
- …
- 9:45 AM: Transaction log backup.
- 9:58 AM: Database crash.
Data Recovery Strategy
In the event of a crash at 9:58 AM, you can restore the database to the point just before the crash using the following steps:
- Restore the Full Backup taken at 6 AM.
- Restore the Differential Backup taken at 10 AM (if available), otherwise, skip this step.
- Apply all Transaction Log Backups from 6 AM to 9:45 AM, and any subsequent transaction log backups until 9:58 AM.
SQL Server Management Studio (SSMS) itself does not automate backup jobs directly, but it provides tools to schedule and automate these tasks using SQL Server Agent, which is a component of SQL Server. SQL Server Agent allows you to create, schedule, and manage jobs that can perform various tasks, including backups.
Here’s how you can automate the backup jobs using SQL Server Agent in SSMS:
Step-by-Step Guide to Automate Backups Using SQL Server Agent
- Open SQL Server Management Studio (SSMS) and connect to your SQL Server instance.
- Expand the SQL Server Agent node in the Object Explorer.
- Create a New Job:
- Right-click on the “Jobs” folder under SQL Server Agent and select “New Job…”.
- Configure the Job:
- General Tab:
- Name: Provide a name for the job (e.g., “FullBackupJob”).
- Description: Optionally, provide a description for the job.
- Steps Tab:
- Click “New…” to create a new step.
- Step name: Provide a name for the step (e.g., “FullBackupStep”).
- Type: Select “Transact-SQL script (T-SQL)”.
- Database: Select the database you want to back up (e.g., “DemoDW”).
- Command: Enter the backup command:sqlCopy code
BACKUP DATABASE DemoDW TO DISK = 'C:\SQLBackups\DemoDWFull.bak' WITH FORMAT, INIT, NAME = 'Full Backup of DemoDW', SKIP, NOREWIND, NOUNLOAD, STATS = 10; - Click “OK”.
- Schedules Tab:
- Click “New…” to create a new schedule.
- Name: Provide a name for the schedule (e.g., “DailyFullBackup”).
- Schedule Type: Select “Recurring”.
- Frequency: Set the desired frequency (e.g., daily at 2 AM).
- Click “OK”.
- General Tab:
- Create Jobs for Differential and Transaction Log Backups:
- Repeat the above steps to create additional jobs for differential and transaction log backups, each with their own schedules and T-SQL commands.
BACKUP DATABASE DemoDW TO DISK = 'C:\SQLBackups\DemoDWDiff.bak' WITH DIFFERENTIAL, INIT, NAME = 'Differential Backup of DemoDW', SKIP, NOREWIND, NOUNLOAD, STATS = 10;Schedule: Every 4 hours (e.g., 6 AM, 10 AM, 2 PM, 6 PM).
-- Full Backup: Captures the entire database
BACKUP DATABASE DemoDW
TO DISK = 'C:\SQLBackups\DemoDWFull.bak'
WITH FORMAT, INIT,
NAME = 'Full Backup of DemoDW',
SKIP, NOREWIND, NOUNLOAD, STATS = 10;

-- Differential Backup: Captures changes since the last full backup
BACKUP DATABASE DemoDW
TO DISK = 'C:\SQLBackups\DemoDWDiff.bak'
WITH DIFFERENTIAL, INIT,
NAME = 'Differential Backup of DemoDW',
SKIP, NOREWIND, NOUNLOAD, STATS = 10;

-- Transaction Log Backup: Captures all transactions since the last log backup
BACKUP LOG DemoDW
TO DISK = 'C:\SQLBackups\DemoDWLog.bak'
WITH INIT,
NAME = 'Transaction Log Backup of DemoDW',
SKIP, NOREWIND, NOUNLOAD, STATS = 10;
Regarding the backup strategy, we will not dive deeply into alternative scenarios such as the SQL Server crashing. In the event of a SQL Server crash, you would need to identify the most recent full, differential, and transaction log backups, restore the SQL Server instance, and then sequentially restore these backups to bring the database to its last known good state. Additionally, implementing high availability and disaster recovery solutions such as Always On Availability Groups, log shipping, and failover clustering can provide further protection against server crashes. In another post, we will cover the detailed steps and best practices for handling a SQL Server crash.
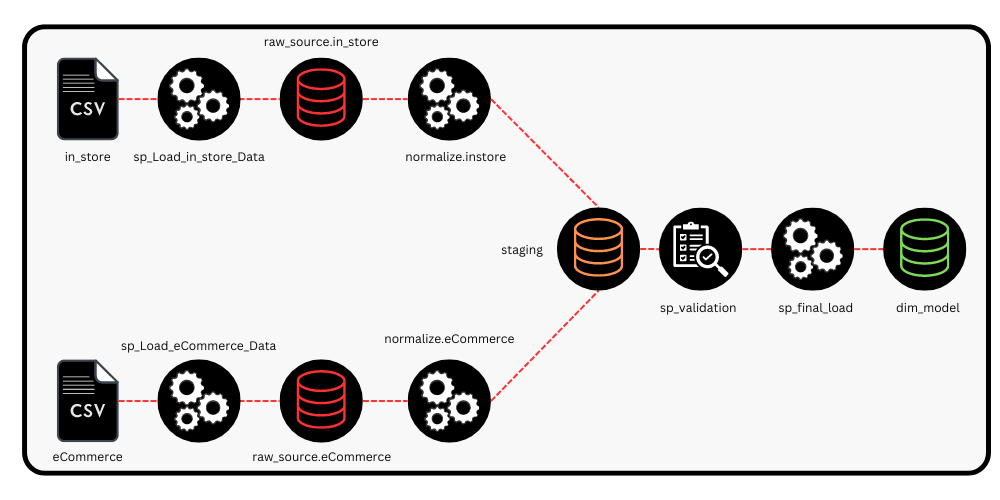
ETL Process


| Order | Schema | Procedure Name | Summary |
|---|---|---|---|
| 1 | clean | sp_DeleteAllData | Deletes all existing data to ensure a clean state. |
| 2 | raw_source | sp_Load_eCommerce_Data | Loads raw eCommerce data into the database. |
| 3 | raw_source | sp_Load_in_store_data | Loads raw in-store data into the database. |
| 4 | normalize | sp_Normalize_eCommerce_Data | Normalizes the loaded eCommerce data. |
| 5 | normalize | sp_Normalize_InStore_Data | Normalizes the loaded in-store data. |
| 6 | validation | sp_ValidateData | Validates the data to ensure accuracy and consistency. |
| 7 | final | sp_Load_Final_Data | Loads the final, processed data into the target tables |
Importance of Data Validation in a Data Warehouse
Trust and Confidence: Accurate data builds trust among users and stakeholders, ensuring they have confidence in the data-driven insights and decisions.
Data Integrity: Ensuring that the data is accurate and consistent throughout the warehouse is essential for making reliable business decisions.
Error Detection: Early detection of errors helps prevent faulty data from propagating through the system, reducing the risk of inaccurate reporting and analysis.
Compliance: Many industries have regulatory requirements that necessitate accurate data reporting. Validation helps meet these compliance standards.
Performance Optimization: Ensuring data accuracy can improve query performance by preventing the need for extensive data cleaning and reprocessing.

Conclusion
In this discussion, we explored the design and implementation of a conceptual data warehouse in SQL Server. Our goal was to build a strong foundational knowledge by relying solely on SQL Server’s native capabilities, without using any external tools.
We covered the importance of creating an Entity-Relationship Diagram (ERD) and dimensional modeling. These techniques are crucial for understanding the data structure and ensuring efficient data organization, which is essential for effective data warehousing.
Additionally, we discussed the significance of creating backups and designing a robust database architecture. Proper backups ensure data safety and integrity, while a well-thought-out database architecture facilitates efficient data storage and retrieval.
To help you get started, you can download the SQL scripts from our GitHub repository and experiment with them. This hands-on approach will solidify your understanding and provide practical experience. Download SQL Scripts Here
For personalized guidance, feel free to contact me for a free consultation: Book a 30-minute consultation.
Thank you for reading!


Leave a Reply